One thing that I have found over the years teaching students is that framing up subjects for an interview is not something that comes naturally, even after a young lifetime of seeing it done on television. But there is more to simply placing your subject in the frame in terms of height and width. We need to consider the background composition and geometry, lighting, and how one might use artistic license to better tell your subject’s story.
The Basics of Framing
If you poke around on the internet or even do something radical like seek out a book on the topic, you will quickly encounter the “rule of thirds” as applied to the standard talking head interview. It is a “rule” for the simple fact that it works.
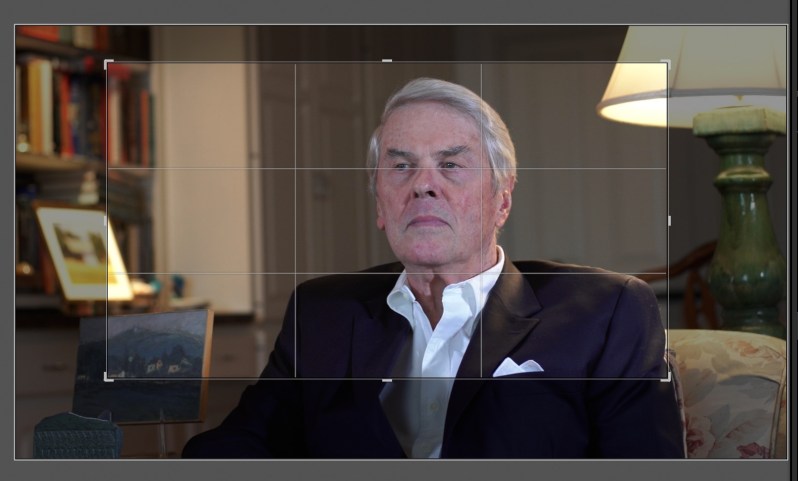
Figure A is a screen grab of a 1920 x 1080 still frame taken from an interview and imported into Adobe Lightroom for the purposes of illustrating framing and cropping. (It’s from an interview that Jack Davis and I did with Charlie Ferguson, the former Editor-in-Chief of the New Orleans States-Item.) It depicts the window with the crop command engaged and the aspect ratio locked to 16×9, the standard and 4K video standard. You will notice that the bar separating the middle third from the top third crosses exactly at the subject’s eye level. This is no accident! Framing the face in this regard helps you keep the subject from falling too low or to high in the frame.
So for a handy beginner’s lesson #1, consider using the “rule of thirds” to align the horizon of your interview. You will find that this is an effective framing tactic whether the shot is wide, like the uncropped view above, or cropped very tightly.
The other aspect of this screen grab worth considering is how to frame the shot horizontally. A good guide worth heeding is to pay attention to what I call the “anchoring shoulder.” A secondary consideration is creating open space in the direction towards which the subject gazes. To wit, the subject is not centered in the frame, but offset in the direction opposite the one that they face. Consider a series of crops of the above image and how horizontal framing affects the visual dimension of the shot.


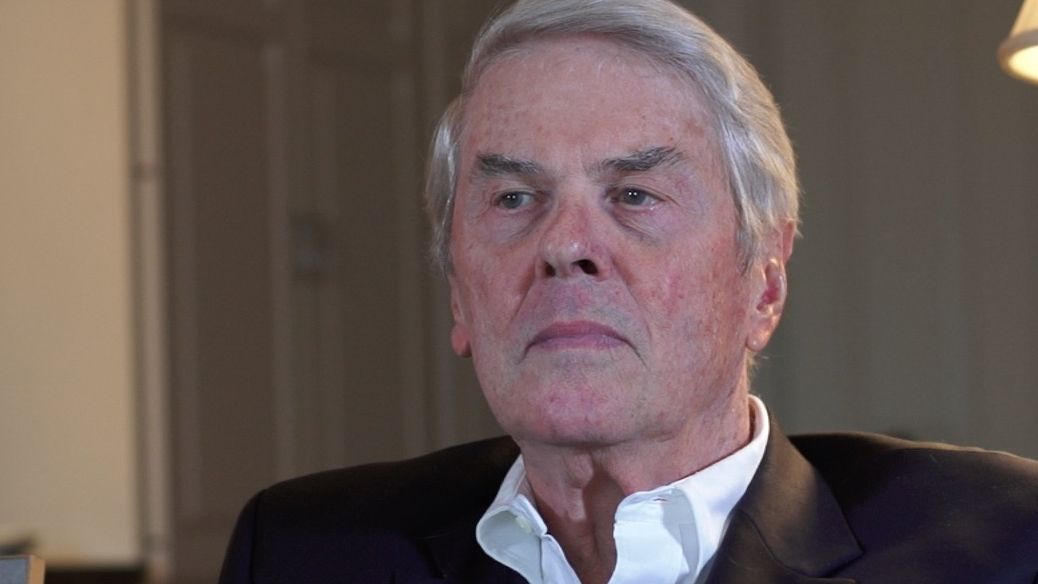
If we consider the eyes and subject’s left shoulder to be an anchor point on which we zoom, then as we crop further in we can see that the subject remains framed in a pleasing, non-distracting way. (As an aside, consider the distracting nature of the lamp when the viewer only sees a small part of it.)
Consider for a minute the way that just paying a little bit more attention to your subject’s anchor points (eyes at top 1/3 line, outside shoulder) true up even an otherwise not entirely successful shot (blurry, background issues.) See below:


The Perils of Choosing a Background
Sometimes the setting available for your interview is a challenge. Aside from whatever audio problems it presents, you must now try to make the best of the visual material. Then there are other times when presented with a beautiful scene but that you know to use it will cause you to violate all of the fundamentals of lighting. Knowing what to do in any given situation often requires experience as learning what to do and, perhaps more importantly, what not to do. Still, there are a few basics to keep in mind.
Rule 1: Further away is better.
Caveat: You don’t always have the option of placing your subject in front of an expansive background. Sometimes the interview must take place in a cramped and even dingy room with bad light. When this is the case, do what you can to minimize the shortcomings of environment. How? First, frame your subject tightly as is comfortable and minimize the background. Second, be sure to bring your own lights. You never want to rely on ambient lighting if you don’t have to do so. We’ll talk more about lighting in another post, but I’ll deal with it here where relevant.
Placing the background further away from your subject creates greater separation between the subject and your surroundings. We have discussed the effects of sensor size, focal length, and above all, aperture on perceived depth of field, but even with these technical tools at your disposal, it is best to do what works naturally through thoughtful positioning of your subject. This is why it is possible, with the right framing and composition, to shoot a perfectly professional looking interview with an iPhone.
Scholars love their books, and often will suggest being filmed in front of them. In fact, this is the pro-forma “professor” shot. Sadly, it is often a hot mess. Along with being a professor is to have an office the size of a large coat closet – all jammed with books and papers. It’s hard to get away from your background in this instance. Consider the following two frames.


In Figure B, we have a shot (that is too dark) but is also so close to the books that you can read the titles in the background. Using a wider aperture would perhaps make the depth of field more shallow and thus separate the subject from the background, but it would also make holding the focus more difficult. He’s also in the middle of the frame and looking directly at the camera which might be appropriate for a TV journalism interview but not for our purposes. In Figure C, we have a similar situation. The lens has been opened up as much as possible making for a challenging focal plane, but also by placing the books at an angle, it creates at least some falling away of the focus on the background. Neither situation is ideal.
It is not just scholars, however, who like to have props in their shot. Consider the following image:

Now Figure D violates the “rule of thirds” but it hews to the principle of an anchored shoulder. Better yet, it places some space behind the subject. It manages to have props in the shot without them taking away from the main topic, the interviewee. How might the camera operator achieved this and the rule of thirds? Consider moving around, altering the height of the shot, the height of the subject. Here the subject sits on a tall stool. She seems to be going too far off of the top of the frame. The interview team here “gets away with one” because the shot is otherwise so beautifully done. But it could be better yet.
One of the elements that works well in this interview is the use of light. The interview team made sure to illuminate Natalie Mae and make the background darker in addition to distant. The viewer’s gaze rests where it should.
That Light on the Horizon
Rule number one of photography is surely “never shoot into the light.” These are almost always words by which to live unless you are going for some sort of artistic silhouetted effect. Many times I have entered into a room where outside the window we find an amazing view. An equal number of times the subject and/or co-interviewer hopes to incorporate this vista into the shot. When doing so, consider the enormous candlepower of the sun versus the ambient light inside of a room. A couple of examples:

We’ve all seen that shot of the nightly news with the city skyline as a backdrop. I’m going to let you in on a “magic of Hollywood” secret: The skyline is sometimes a fake, and when it is not a fake – a live shot, the glass is heavily tinted. In fact, the tinting on the glass is like a powerful neutral density filter on the lens. We still see the daylight behind us well, but there are hundreds of thousands fewer lumens coming in.
In Figure E, we arrived at a high rise office tower on Poydras Street and set up in a conference room with a spectacular view of the skyline of New Orleans’s Central Business District. Unfortunately, we had no way to counteract the enormous volume of morning light streaming in through the window. I had brought a pair of 500K Flowlights in and turned them up full blast to balance out the light coming in. This was a failure all around. We ended up hot-spotting the subject’s face (more of a challenge on bald men, and on subjects with darker complexions where contrast of light reflection and skin tone is greater) and we still ended up with a backlit shot. Worse, because I didn’t stop down the shot enough, we didn’t really end up with much of that fabulous skyline anyhow. Lesson? Sometimes you can’t fight conditions. Plus this was early in my filming career. I might have done a few things differently, like take advantage of the great distance behind the subject and stop the lens down. I didn’t understand either the value of having a reflector instead of just a light, bouncing that candlepower back onto the subject’s face. Alas.
When does this sort of shot work, and work well? Timing is everything:

Note that the sun is not streaming in, but is mostly to our back and side in this shot. The yard in the distance is in long shadow, greatly reducing the amount of light coming in. I still needed lights to fill in, and could frankly have used more because you must balance the background light with a proportionate amount of light on the face. But there is no arguing about the value of placing distance behind the subject. Here we have a pleasing perspective that trails gently away as it falls out of focus. Compositionally, the only failure here is the aluminum door jamb dividing the frame vertically.
These are only some basics. I’ll write another post dealing with more complex arrangements soon.
