UPDATE, Feb. 2024: This enthusiastic review didn’t sustain itself. After about 3 years worth of service, these recorders would neither power externally or use internal batteries. They did not hold up to long-term use and ended up being a poor investment.
Equipment just seems to get better and better for oral historians and independent filmmakers. The Tascam DR-70 is an example of this trend.
The DR-70 offers several improvements over the Zoom H6 for dual-system recording with DSLR cameras, not the least of which and most obvious is its much more stable mounting arrangement. (The Zoom is notoriously difficult to mount securely.) But a couple other features that are valuable is the range of recording options including the ability to record four tracks independently of each other and a feature create a simultaneous duplicate recording at a different sound level. Another nice feature is that you experience the changes you make to the audiorecording settings on the DR-70 as you make them unlike on the Zoom, which you cannot hear until you exit the menu. This makes far more sense to me.
The audio level knobs are not as nice as the Zoom’s, nor is the DR-70’s display. Like the Zoom H6, the DR-70 is battery hungry. Right now the Studio is looking into acquiring a rechargeable USB battery pack so we don’t go through a lead mine’s worth of AA batteries to power these devices. I have bought and highly recommend this battery pack, worth every penny of the $29.99. It’s heavy, but I mount it to a tripod leg with velcro. But the menus are a little bit more easily navigated. It is not, however, in the least bit intuitive for new users who might be historians and not audio engineers. Thus, this post.
The instruction book that comes with the DR-70 is almost entirely useless as a guide to new users. The following is a set of instructions germane to the students who will be using this unit to record oral history interviews in the Documentary and Oral History Studio’s HIST A404 course, but it will contain tips and insight that will be of use to many users, particularly oral historians. If you are looking for some comments about the DR-70 from a professional audio engineer (and not a historian like me), I found that this entry by Tiny Bird Productions offered a lot of valuable insight.
Here is an overview of the buttons and such on the DR-70:
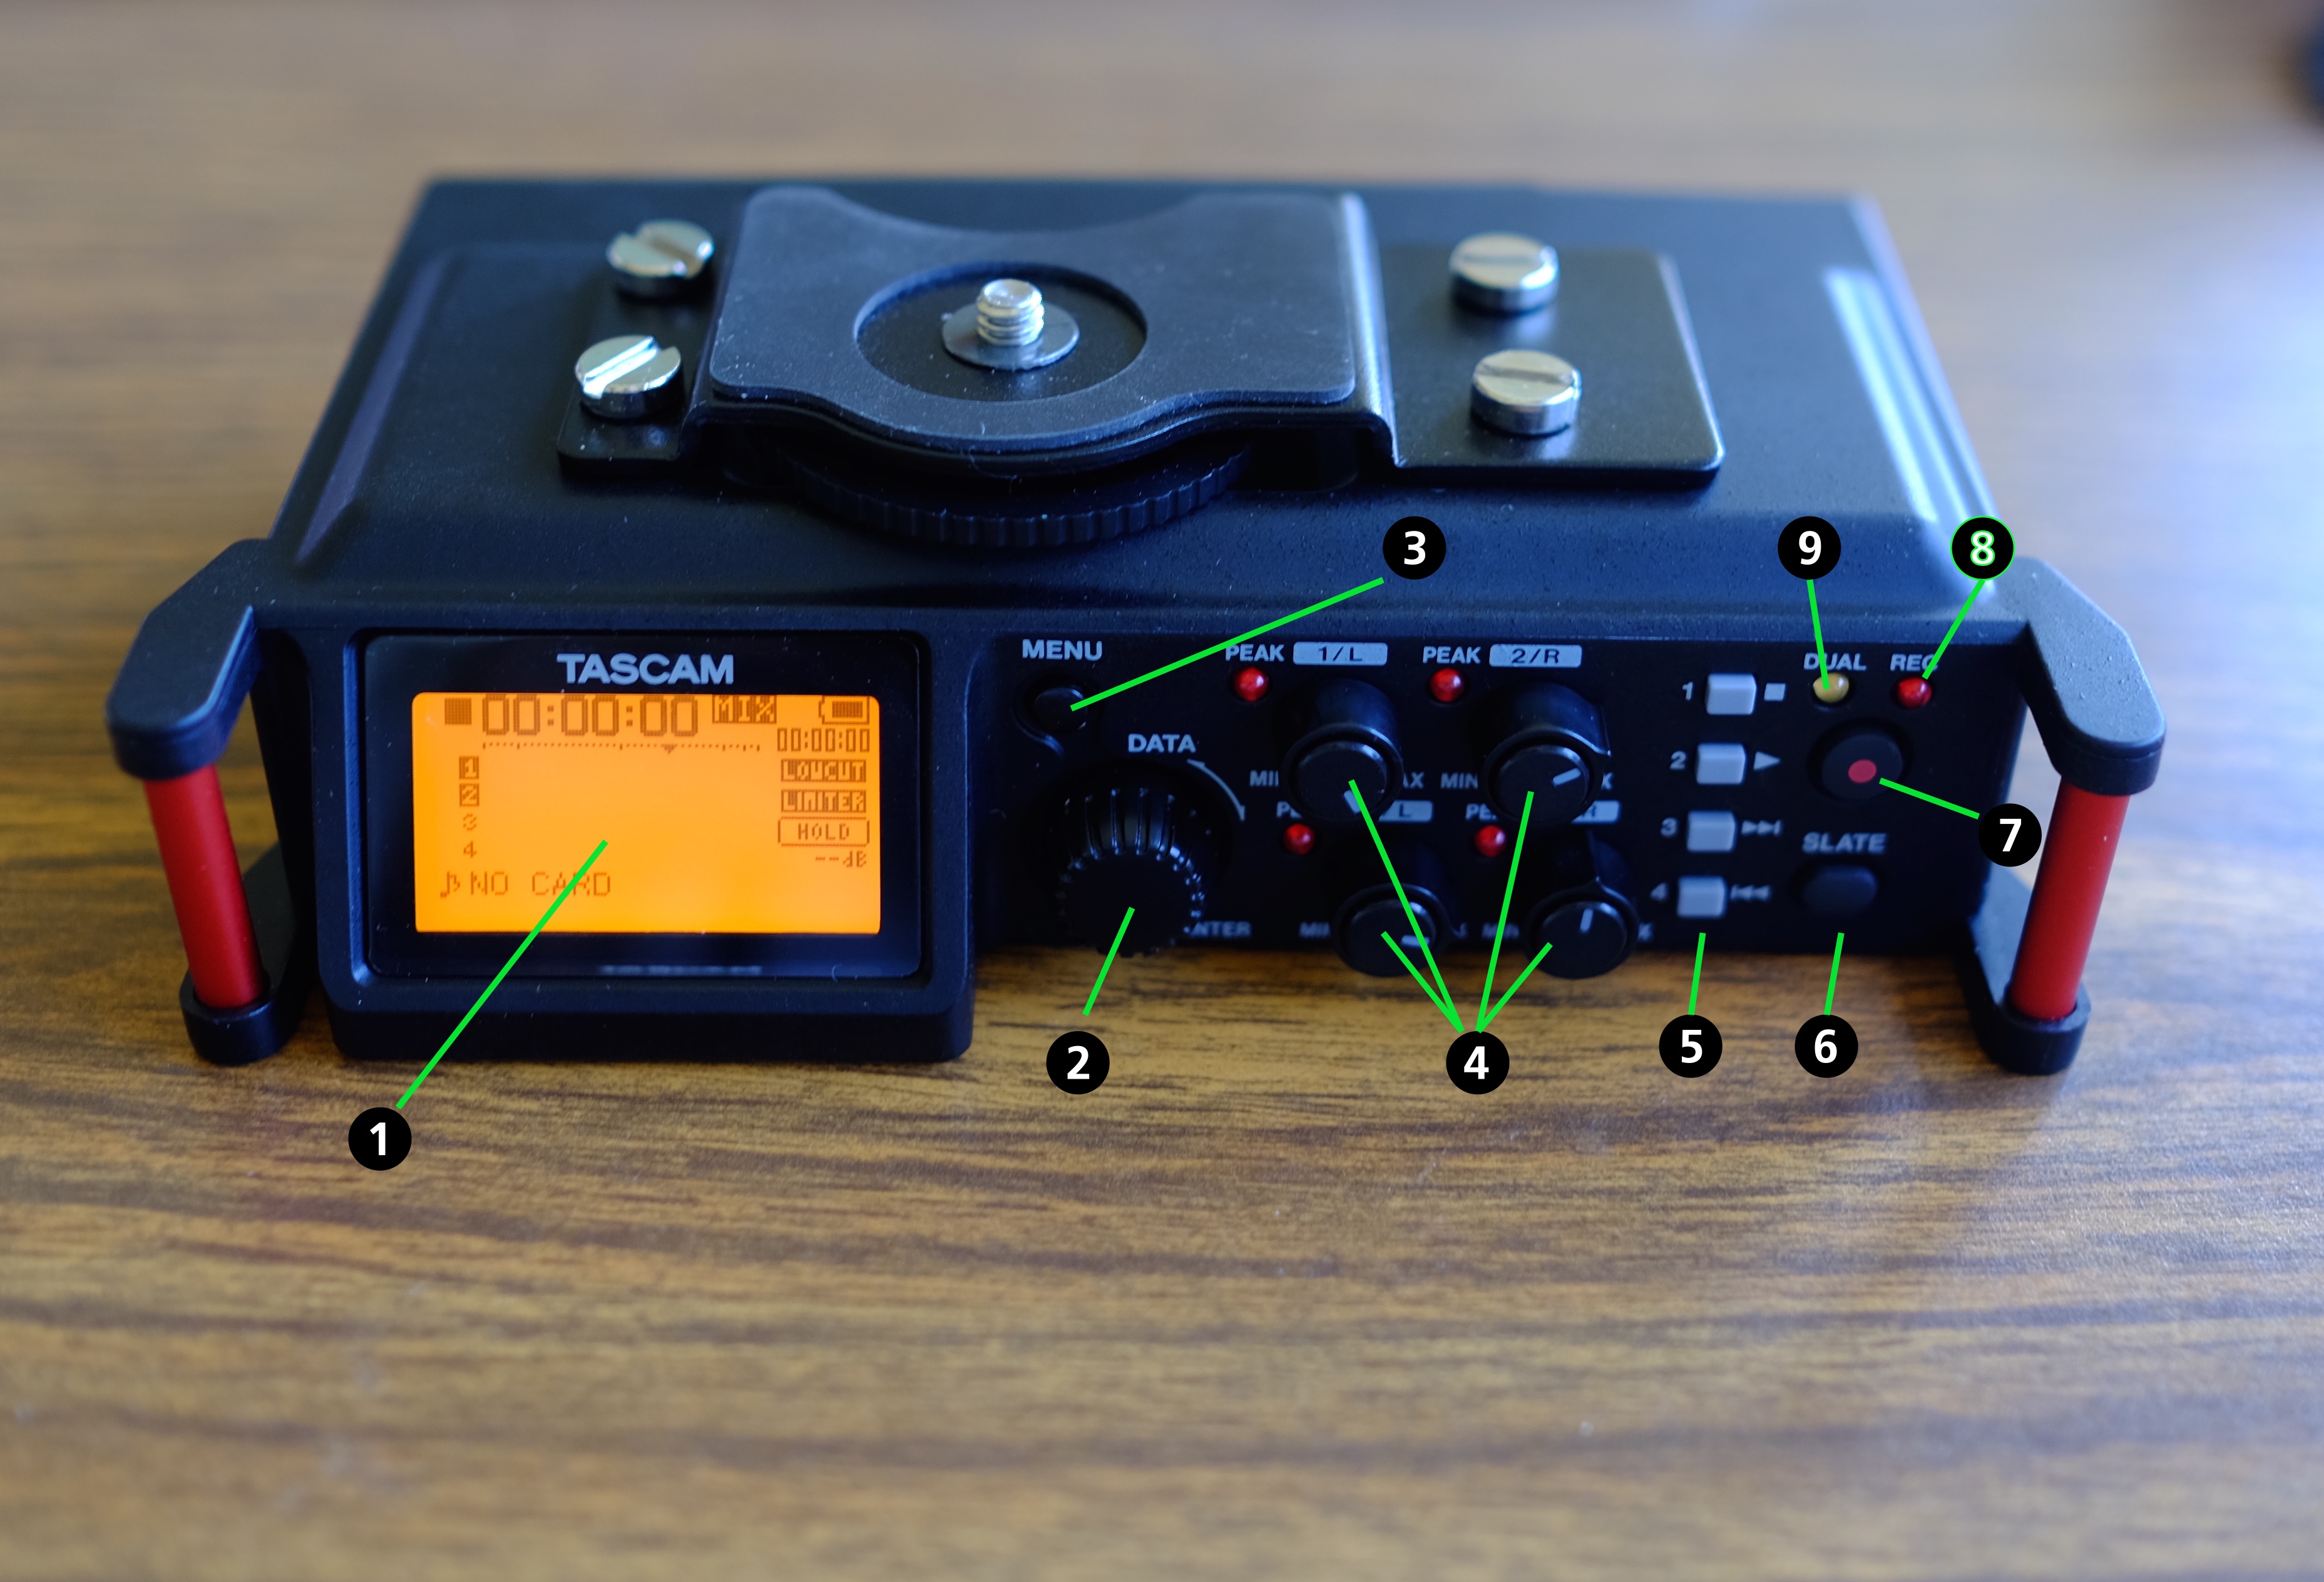
- Display window showing various settings and audio meters. When a line number is in the solid box, it means that the microphone for that track is set to record.
- The dial selector. You turn to cycle through a menu and push this button to select.
- The MENU button. Press once to get into the menus. From there, navigate with #2. Press the MENU button to go backwards out of the menu you are in.
- Audio level dials for each of your four tracks
- Playback controls
- The Slate button – this sends an audio pulse to your recordings for syncing up your audio and video tracks. (I don’t cover this feature in this post as of 10/5/15)
- The all-important RECORD button for starting/stopping your recordings
- Recording indicator light
- Indicator light showing that you are recording in DUAL mode
The “front” of the unit:
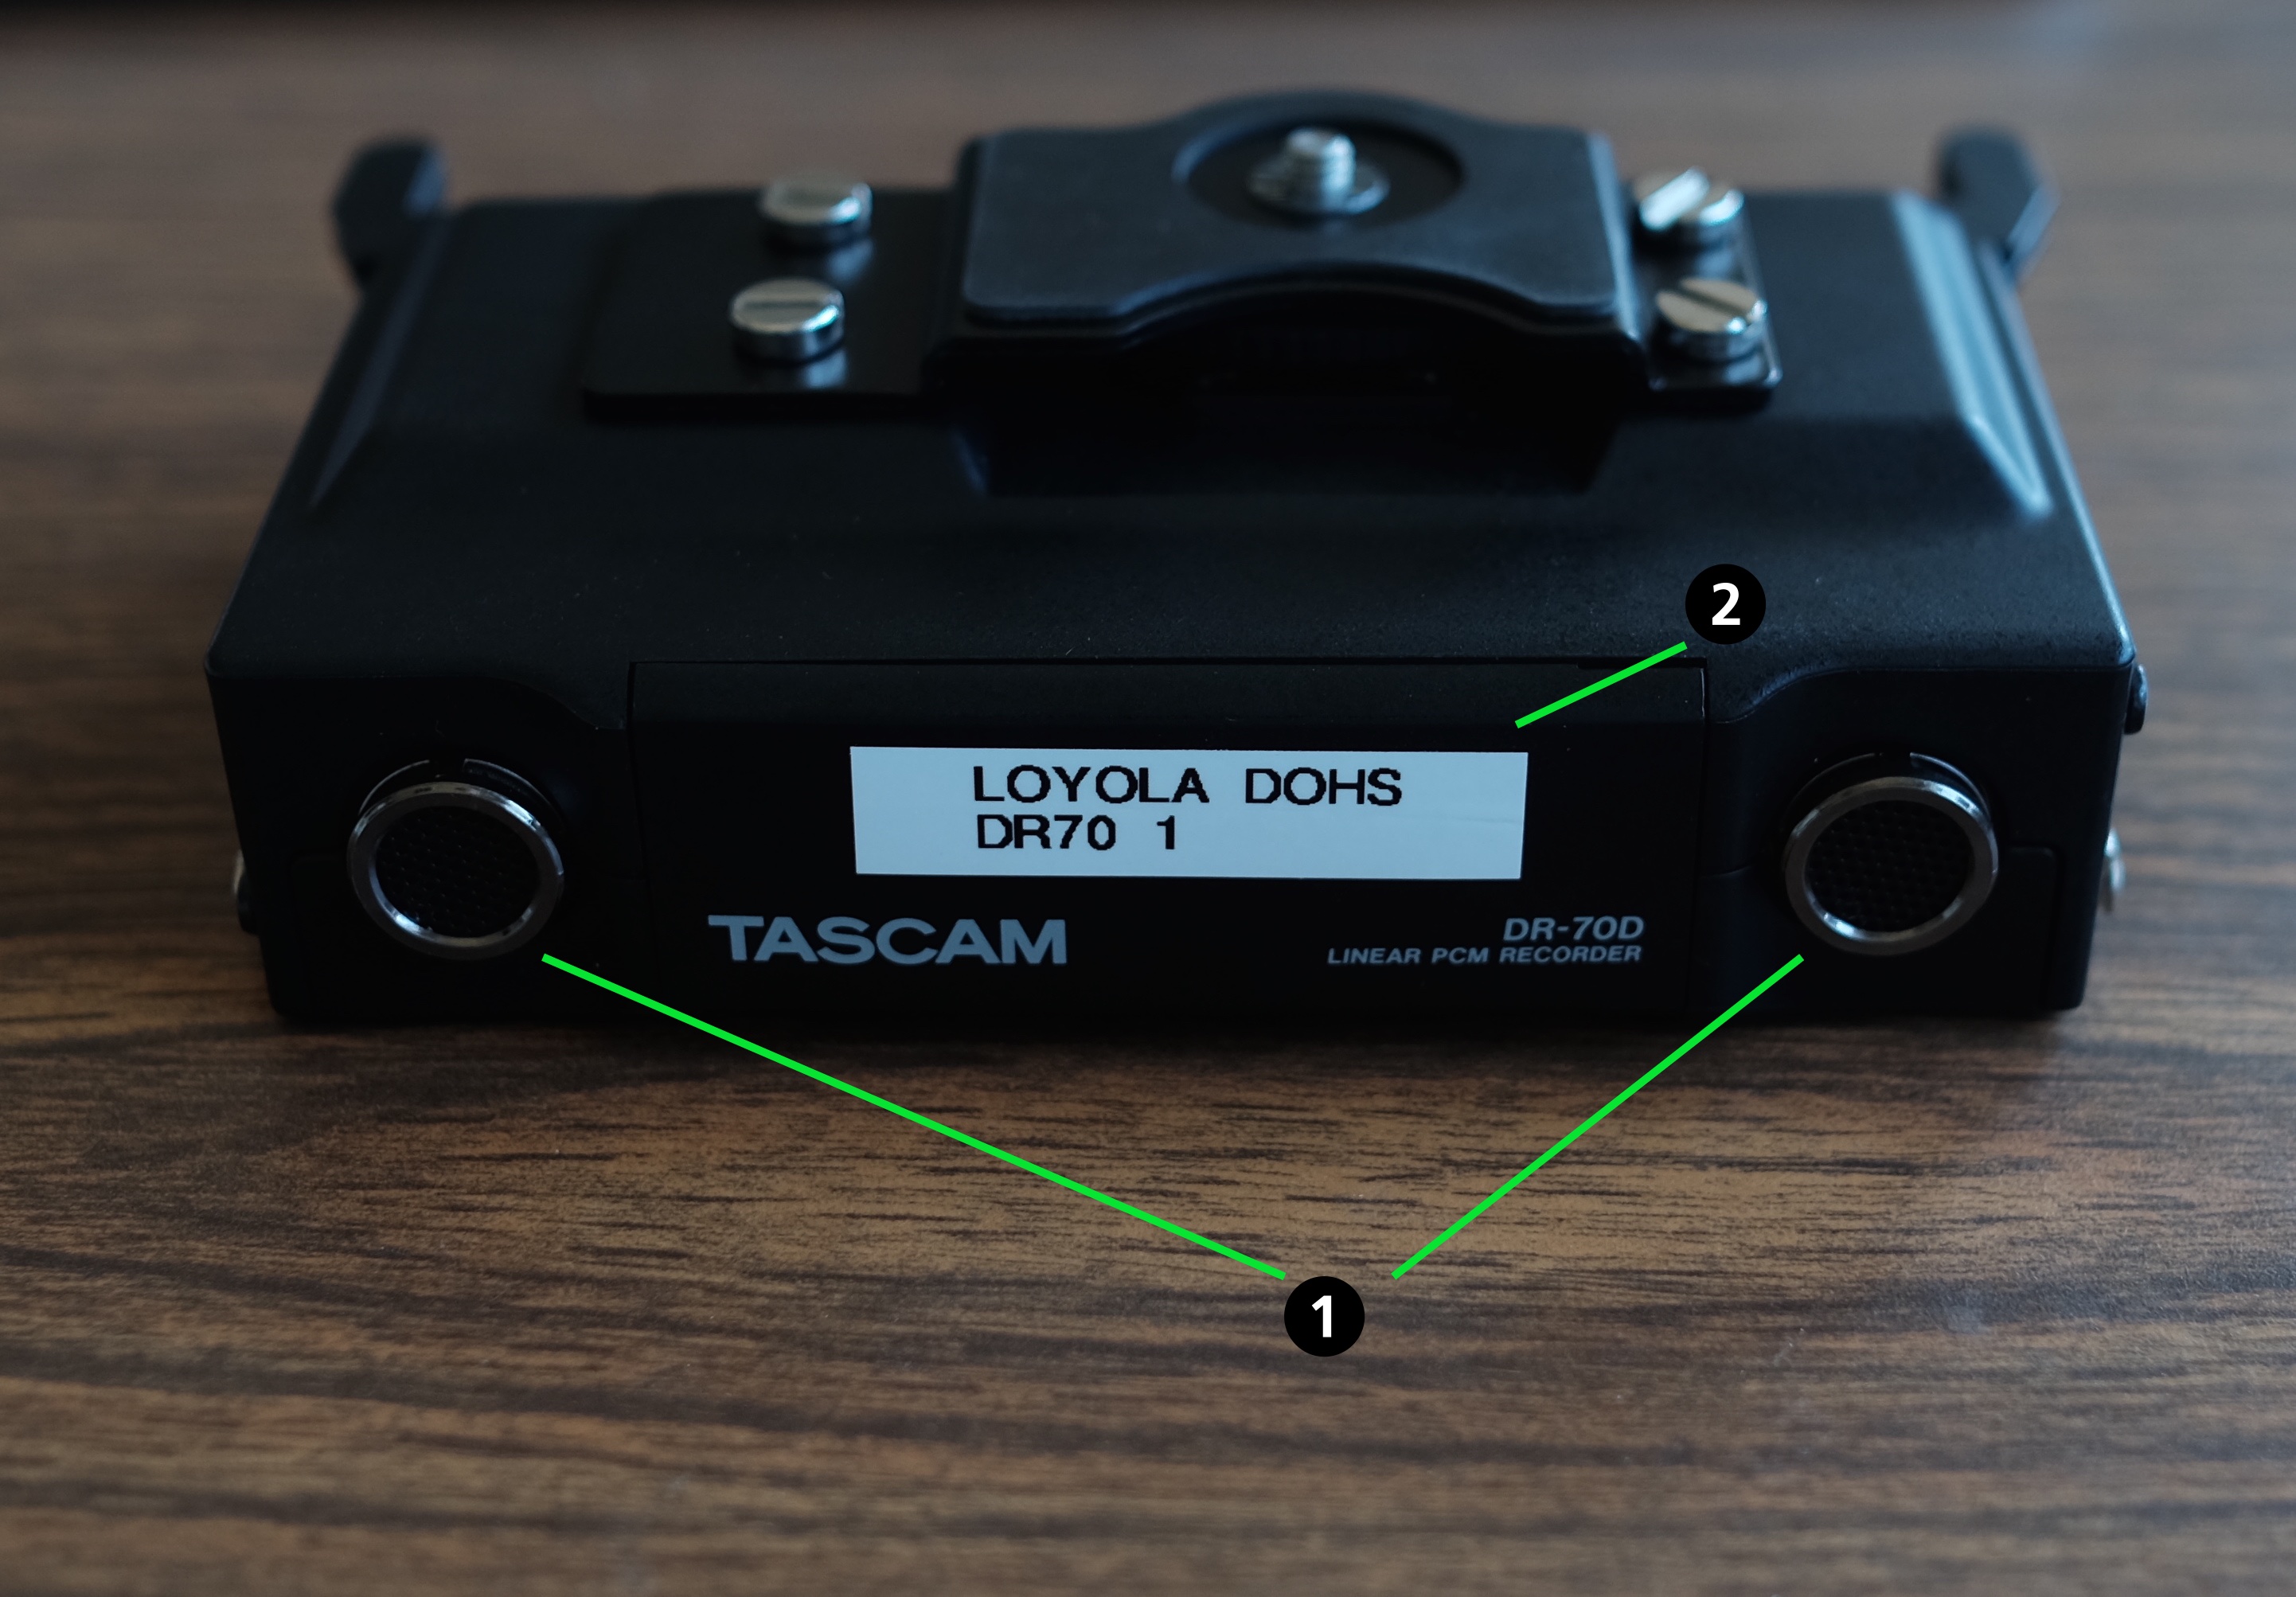
- The DR-70’s built-in shotgun microphones (which aren’t bad.)
- A rather flimsy door that conceals your SD card slot and another door behind which hide four “AA” size batteries.
Operator’s left-hand side:
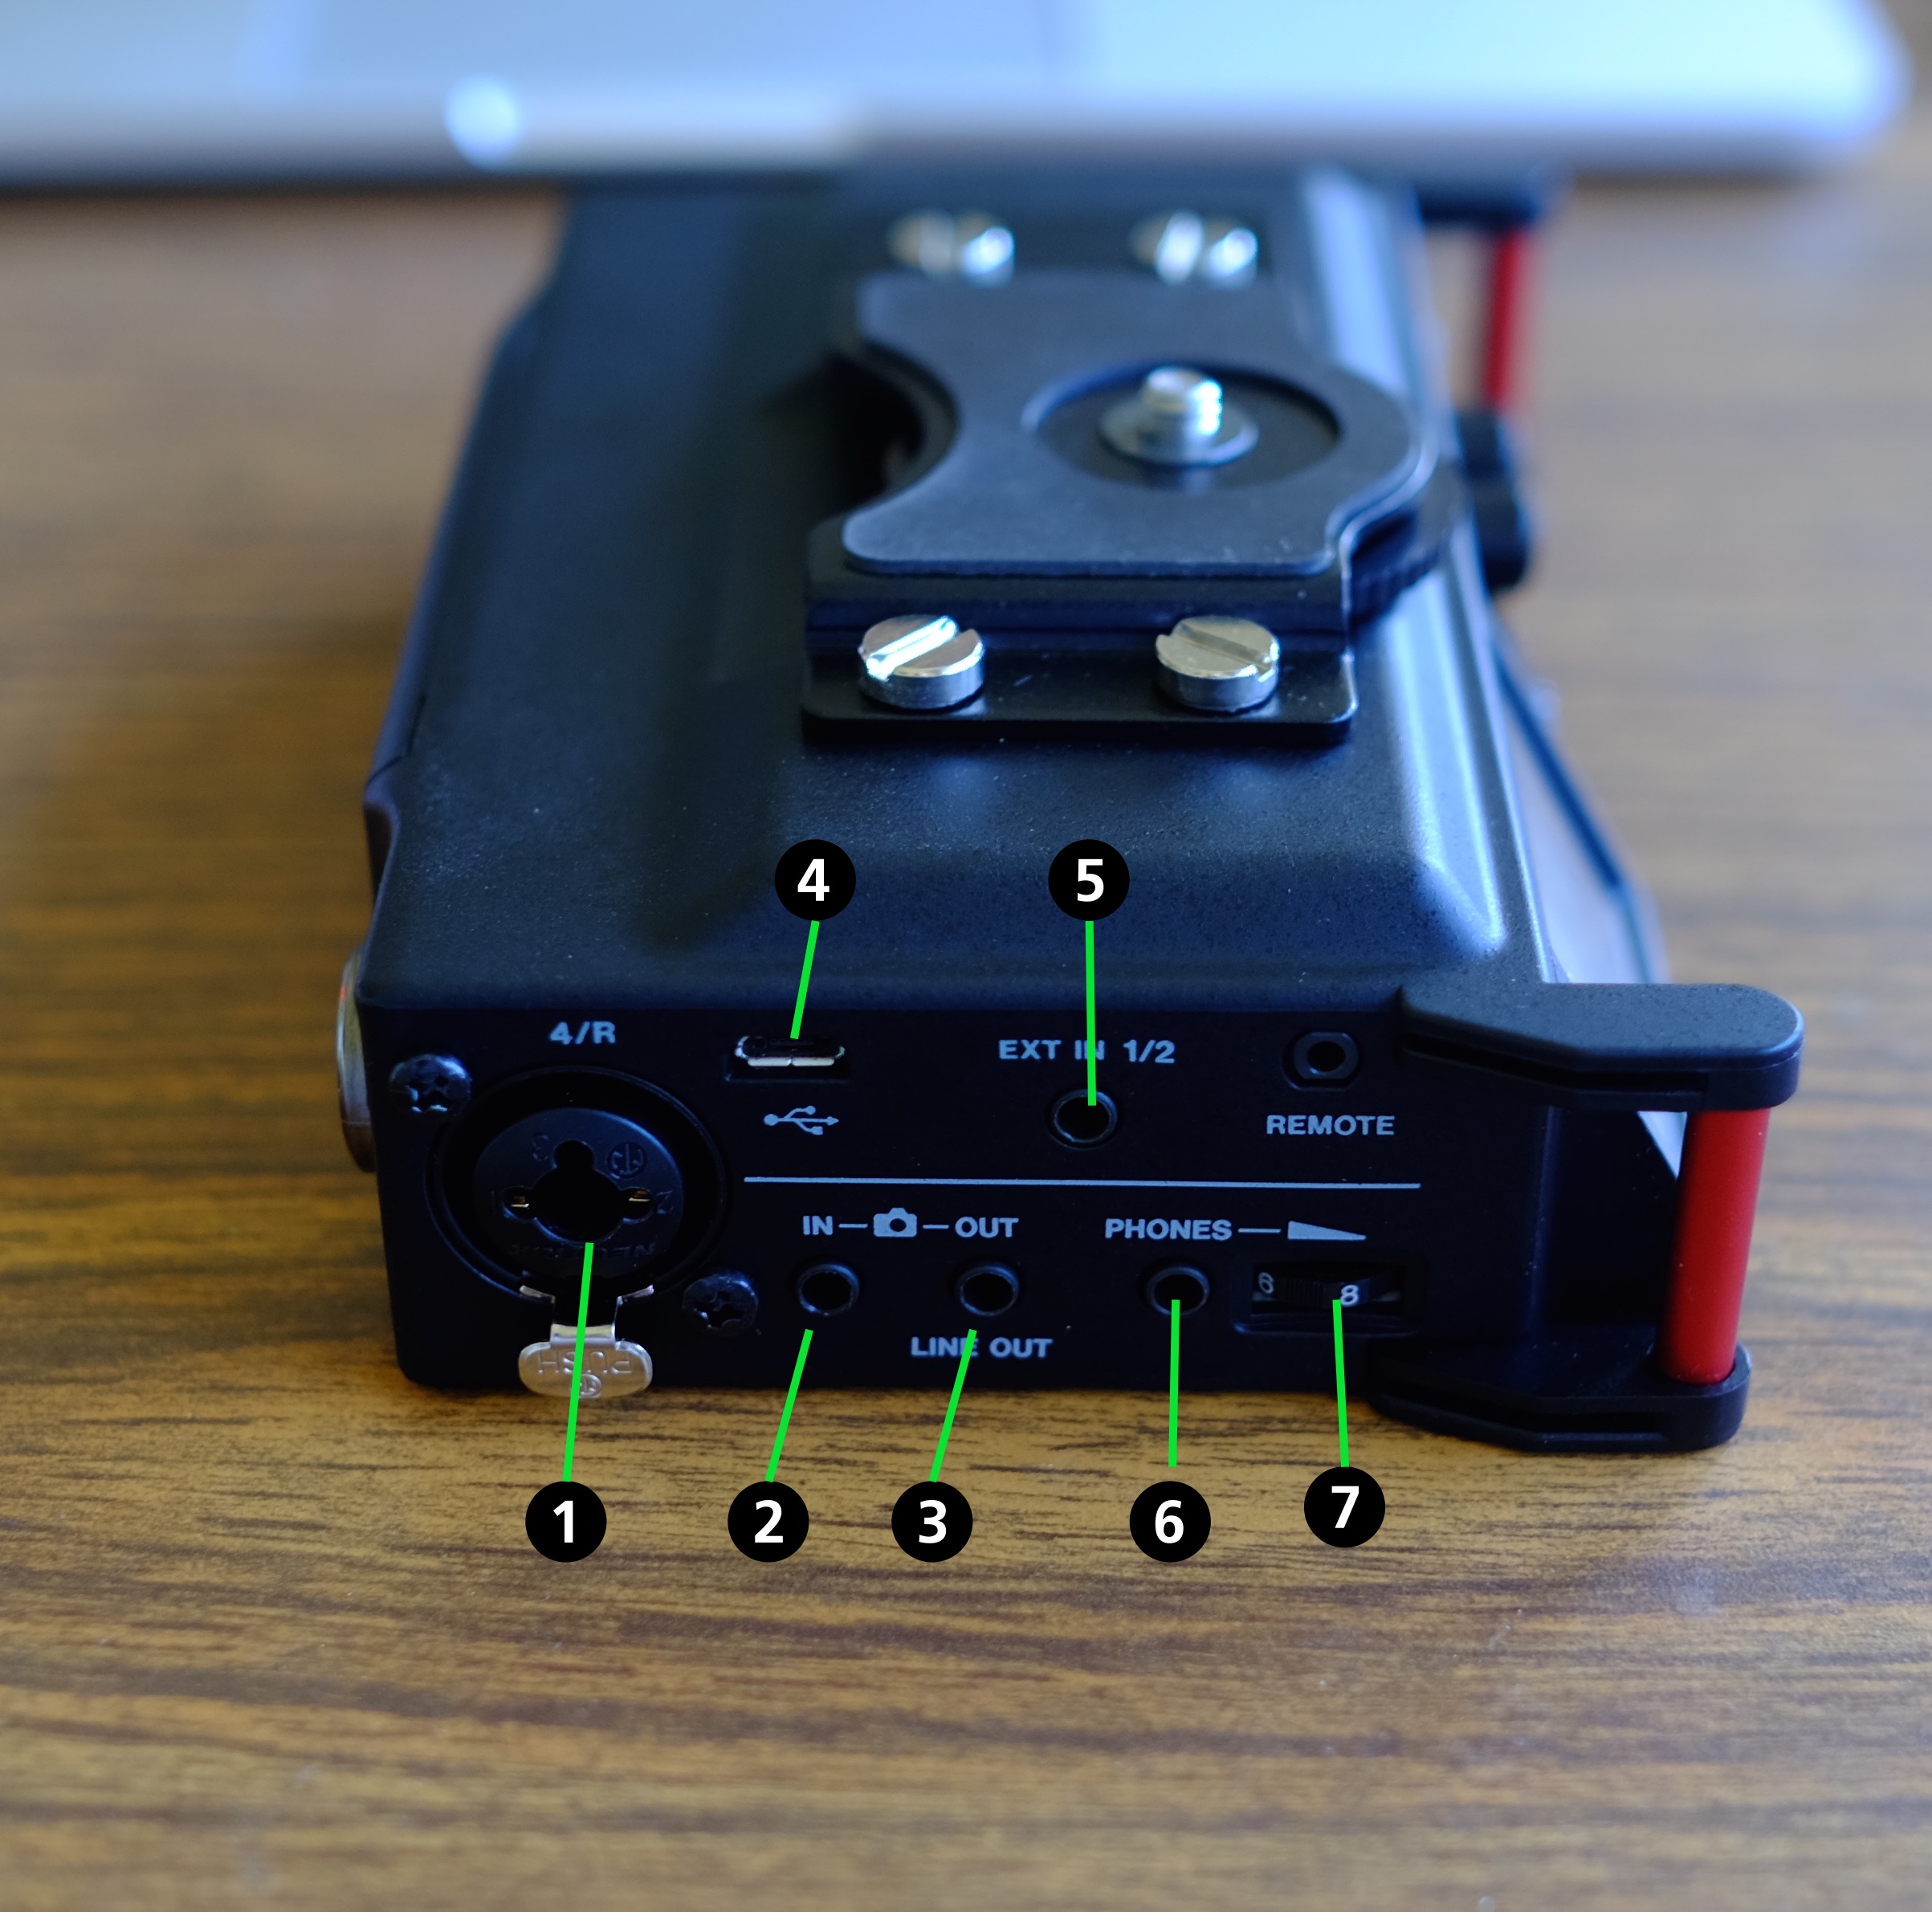
- Line 4 XLR/TRS input
- A line IN from the camera. Why would you use this? I’m sure there is a reason, but I have not found it yet.
- Line OUT to the camera – send a mixed audio signal to your camera’s microphone jack.
- USB port – the DR-70 can be powered by USB power – which is a good idea because it goes through AA batteries rather quickly! (Update 11/11/15: I purchased iMuto 20,000 mAh Taurus x4 Smart Power battery packs for my recorders through Amazon. After testing these out, they will easily last for 6 to 8 hours. In fact, after running it for four hours with microphones attached, the DR-70 had only used 8% of the unit’s power.)
- If you want to use a 3.5mm lavalier or other microphone with this unit, you can plug it in here and send it to tracks 1 and 2.
- Your headphone jack for monitoring.
- The volume control for the headphone jack.
The operator’s right-hand side:
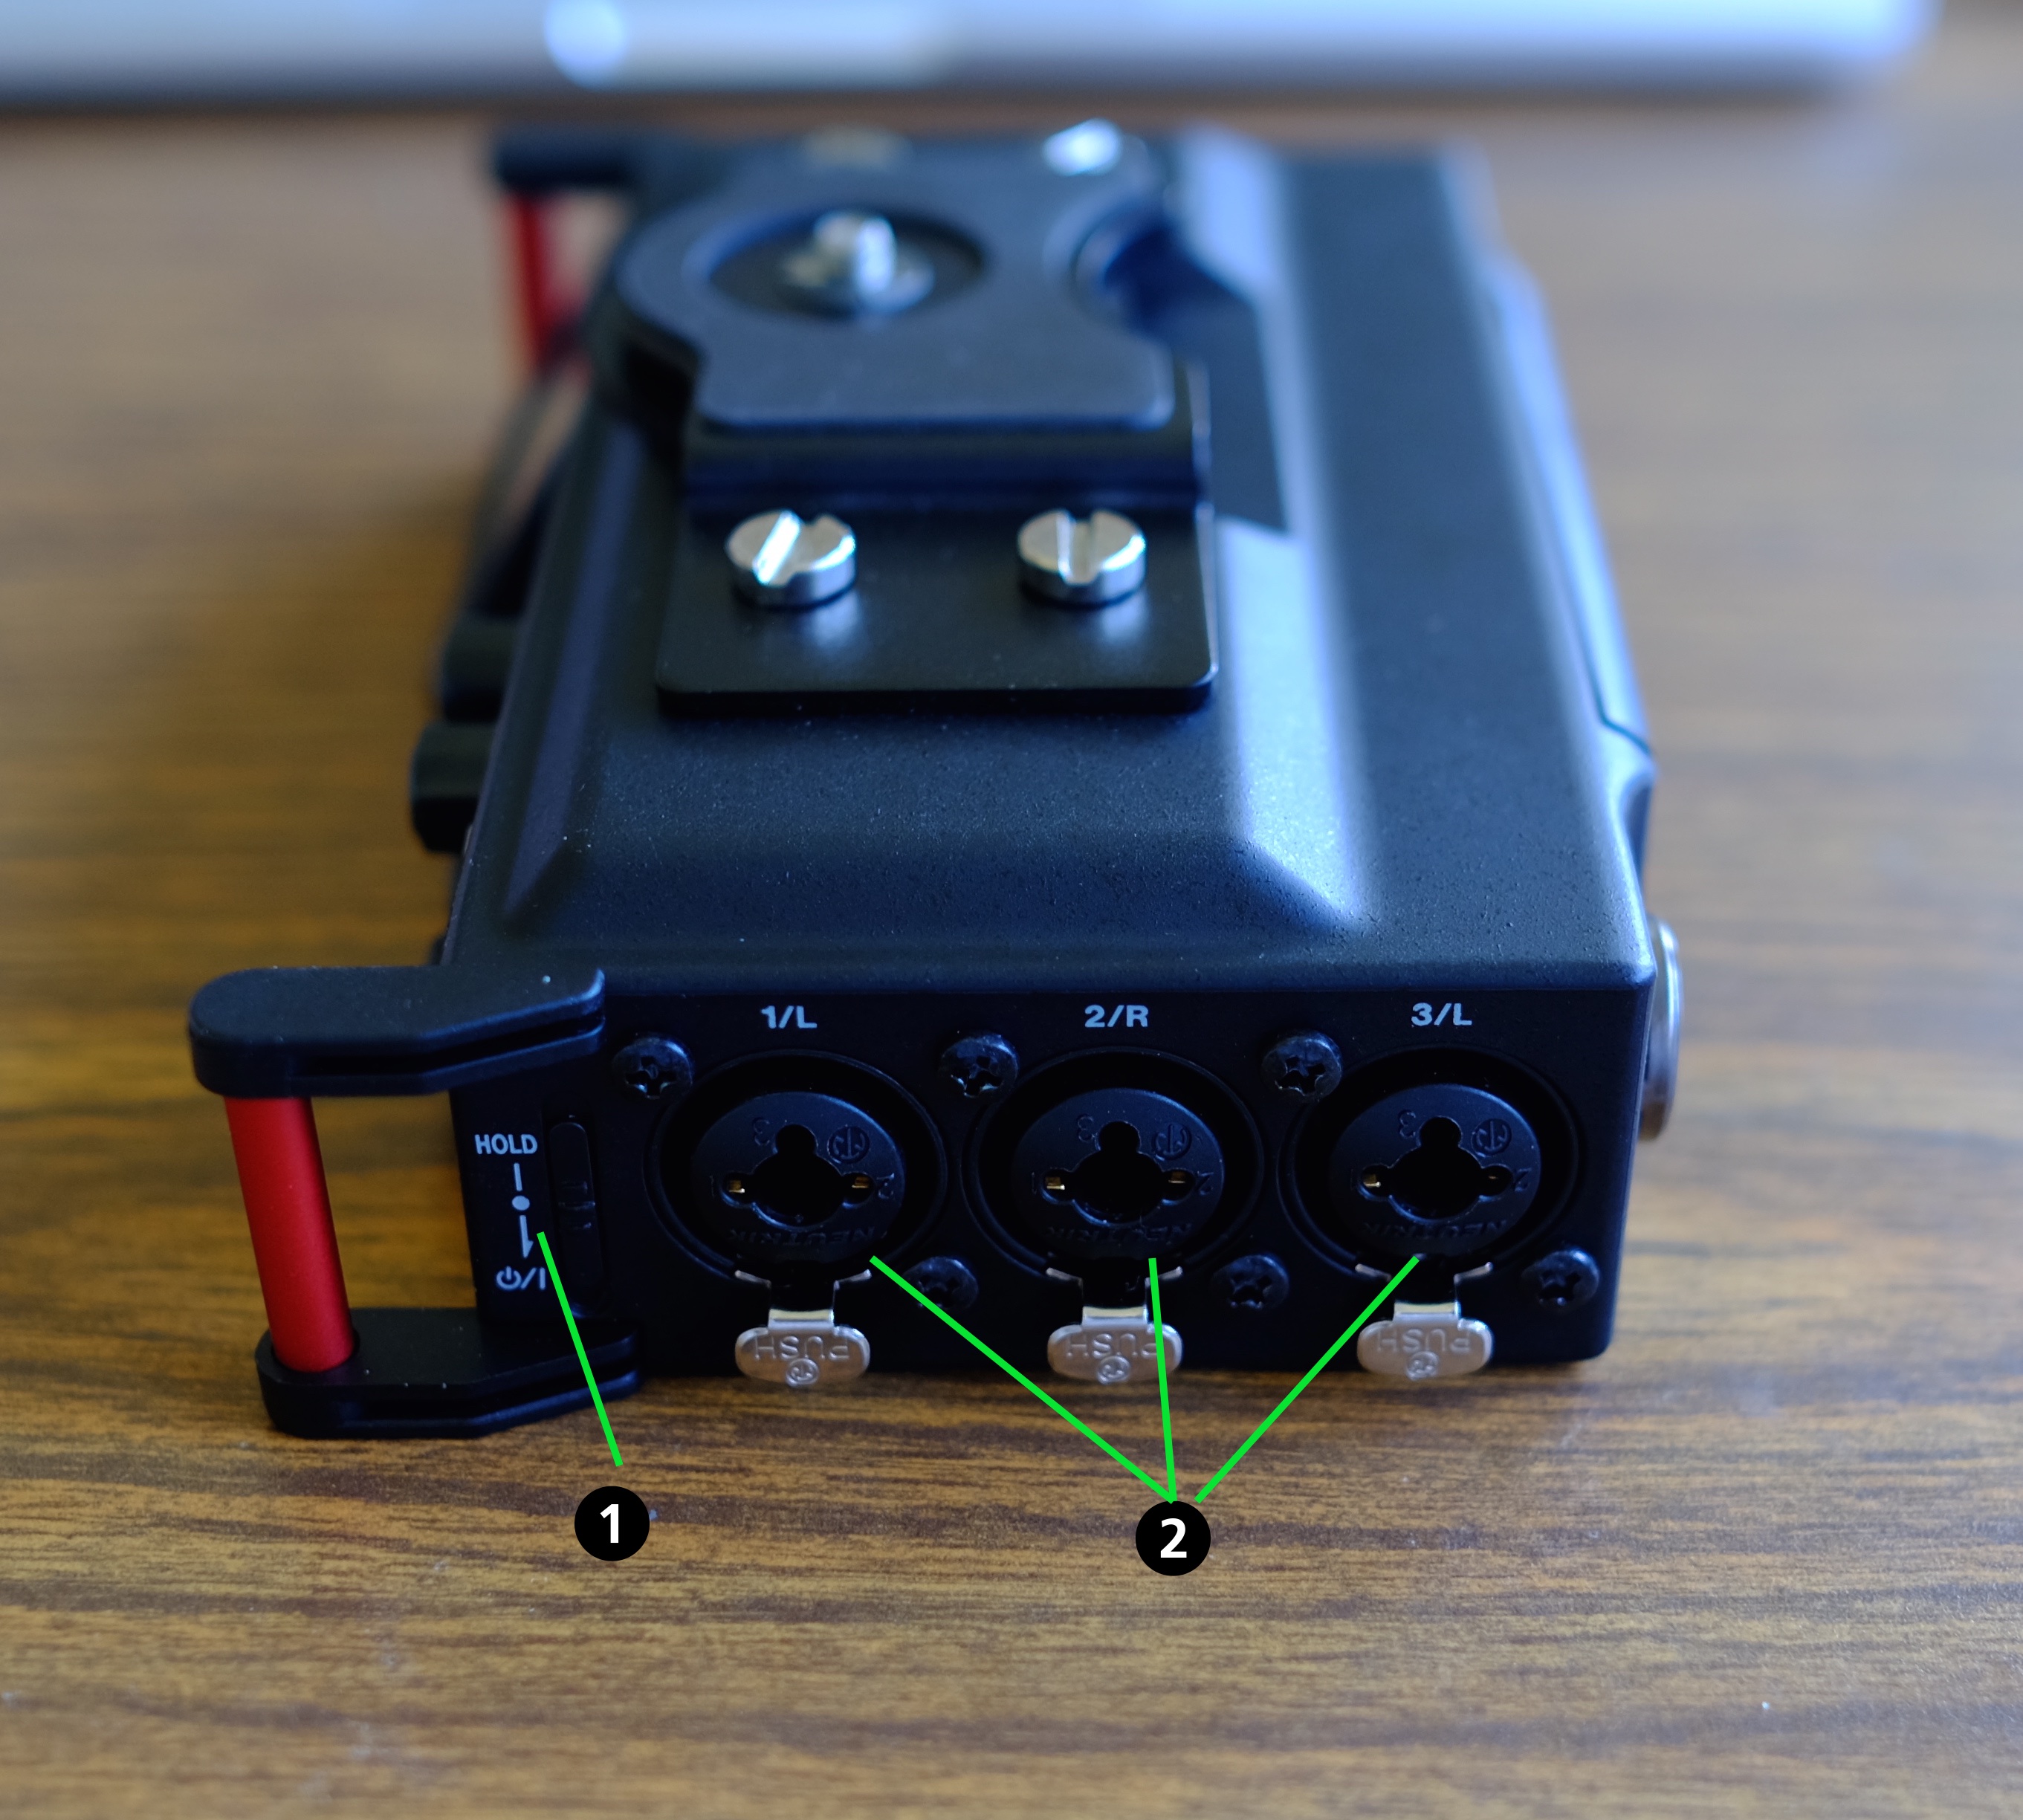
- The power switch – which takes a surprisingly long time to turn on. Too long.
- Lines 1, 2, and 3 XLR/TRS ports.
USING THE DR-70’s MENUS and SETTINGS
Pressing the MENU button will bring up the main menu for the DR-70. The following options in this menu are:
- BASIC
- MONITOR
- INPUT
- RECORD
- SLATE
- MIC
- BROWSE
- OTHERS
First, let’s take the BASIC menu because this is where you will likely make many of your adjustments.
Pressing the selector knob when BASIC is highlighted will take you into this submenu. (Pushing the MENU button always takes you backwards in the menu structure.) This menu enables you to do several things: Setting a line to RECORD or not to record, a “WIDE” or “PAN” setting that we will not really need to worry about, a GAIN setting, and the INPUT setting. You cycle through the settings each line by turning the selector wheel past each channel. So, for each of these settings, some tips:
BASIC -> RECORD: This turns on the line to be recorded or not. Pretty straightforward. Tip: Make sure you aren’t recording any lines that do not have a microphone plugged into because it will add noise to your monitoring (not to mention record a blank audio track.) Select RECORD by pressing the selector wheel and dial it ON or OFF.
Don’t worry about BASIC -> WIDE for our beginner purposes. This deals with stereo pan, and the standard setting on the DR-70 is 50%
BASIC -> GAIN: This sets a base recording level. Your options are LOW, HIGH, and HI+PLUS. Honestly, the LOW setting is way too low – you would have to be recording somebody using a chainsaw or maybe loud music for using this, but for voice interviews it is inappropriate. HIGH is the standard setting, and is what we will use. HI+PLUS is way, way too high unless you were recording an interview with a fruit fly perhaps. I wish that there were a setting somewhere between LOW and HIGH.
BASIC-> INPUT 1/2: Controls the input for lines 1 and 2. You are going to be using XLR mics, so set this to XLR/TRS. You could use a 3.5mm jack in the INPUT 1/2 and set the mic setting to EXT_STEREO, but we will not do this.
NOTE: when you cycle through to channels 3 and 4 you will notice that BASIC -> INPUT 3/4 appears instead. This gives you the option of using MIC (the built-in microphones on the front of the DR-70) or XLR/TRS (inputs 3 and 4 respectively on the side of the unit.)
The MONITOR menu has the following options: MONITOR SEL, which allows you to select MIX (a mix of the microphones being recorded) or CAM (the signal that could be sent in from the Camera line IN.) It should be set to MIX. The OUTPUT LEVEL can be adjusted +/- to get an appropriate signal level into the camera (you will use the audio monitors on the camera to set this.) The OUTPUT GAIN should be set to CAM if you are sending the signal to a camera or LINE if you were sending a signal to something like an auditorium sound system.
The INPUT menu allows you to adjust settings for how the audio sounds. INPUT GAIN should be set to MIC unless you are porting in from a sound system or similar (and then set to LINE). By setting to MIC, you then have the option of turning on PHANTOM POWER. Since we are relying on the batteries in our microphones, do not use phantom power as it just eats up the batteries in the DR-70. Based on the reviews of others, I am going to recommend that the LIMITER remain OFF as it is widely reported to add noise to the recording (a flaw of the DR-70). There is debate as to whether or not to use the LOW CUT filter in an interview or not. I go with 80Hz. Note that LOW CUT and INPUT GAIN are set independently for each channel. Do not mess with the other settings in the INPUT menu unless you really know what you are doing, and return them to their default settings before you return your DR-70 to the Studio if you do change them.
The RECORD SETTING menu is important and offers some of the coolest features of the DR-70 for oral historians and people who record interviews, in my opinion. For our uses, we will use the following recommended settings: FILE TYPE: should be set to MONO. This creates a file on the SD card for each microphone attached independently as either a “mono mix” – that is that both right and left channels are recorded with this audio signal or L/R only (see below under MIC -> MS/MODE below). In post this will allow you to easily select or deselect the microphone that you want to use. It can also be set to STEREO which creates one file of a stereo pair L/R from lines 1 and 2 respectively. Our recording format is going to be WAV 24 bit with a 48k sample. DUAL RECORDING is a cool and useful feature of the TASCAM. By turning it on, the TASCAM will record line 3 and 4 as a replicate of lines 1 and 2 respectively, except that you can set them to record at a lower audio level. This is great because it gives you two recording options on one microphone. Why would you do this? Well, I commonly will put two different shotgun mics on an interviewee when using the Zoom H6 set at different recording levels so that if the high level mic spikes I can use the lower level mic in its place. You cannot, however, use more than two microphones when using this feature because the DR-70 uses lines 3 and 4 to create the dual recording. You will notice that when dual recording is set to “on” that lines 3 and 4 will monitor with the lower audio setting that you choose. The orange LED in the upper right hand corner of the DR-70 will also be lit. If you are using two microphones, I would consider trying to set the dual recording option.
The MIC setting allows you to adjust your monitoring. If you prefer to hear everything mixed (your two microphones) have it set to MS MODE 1/2 -> MONI (you will hear both microphones through both ears.) If you set it to OFF it will just be in the side that the mic is plugged into and will only record to that particular channel in your audio recording. This is a personal preference. If you want to get a fix on an individual mic, you can always turn down the audio level on the other one to listen. Conversely, if you have them set to their respective L/R headphone speaker, you can independently monitor on the fly. Depending on how much noise you have, it might not be an issue. I typically have it set OFF as a standard setting, but this will not affect your recording.
The BROWSE menu allows you to scan through your recordings and play them.
Another menu item of interest to you is under OTHERS -> SYSTEM -> FORMAT which is used to format your SD card. I encourage you to format your SD card before using the DR-70.
Also, the DR-70 allows you to reset and modify file naming conventions under the OTHERS -> FILE NAME menu. Unless you are persnickety about your files and/or are engaged in a large project, you probably won’t use this.
USING YOUR FILES
The SD Card file structure of the DR-70 is a lot more straightforward than the one used on the Zoom H6. Your files will appear all in the same folder, sequentially numbered based on the number of microphones you are recording either individually or as stereo pairs. It’s that easy.
RIGGING UP the DR-70 with the Panasonic GH3.
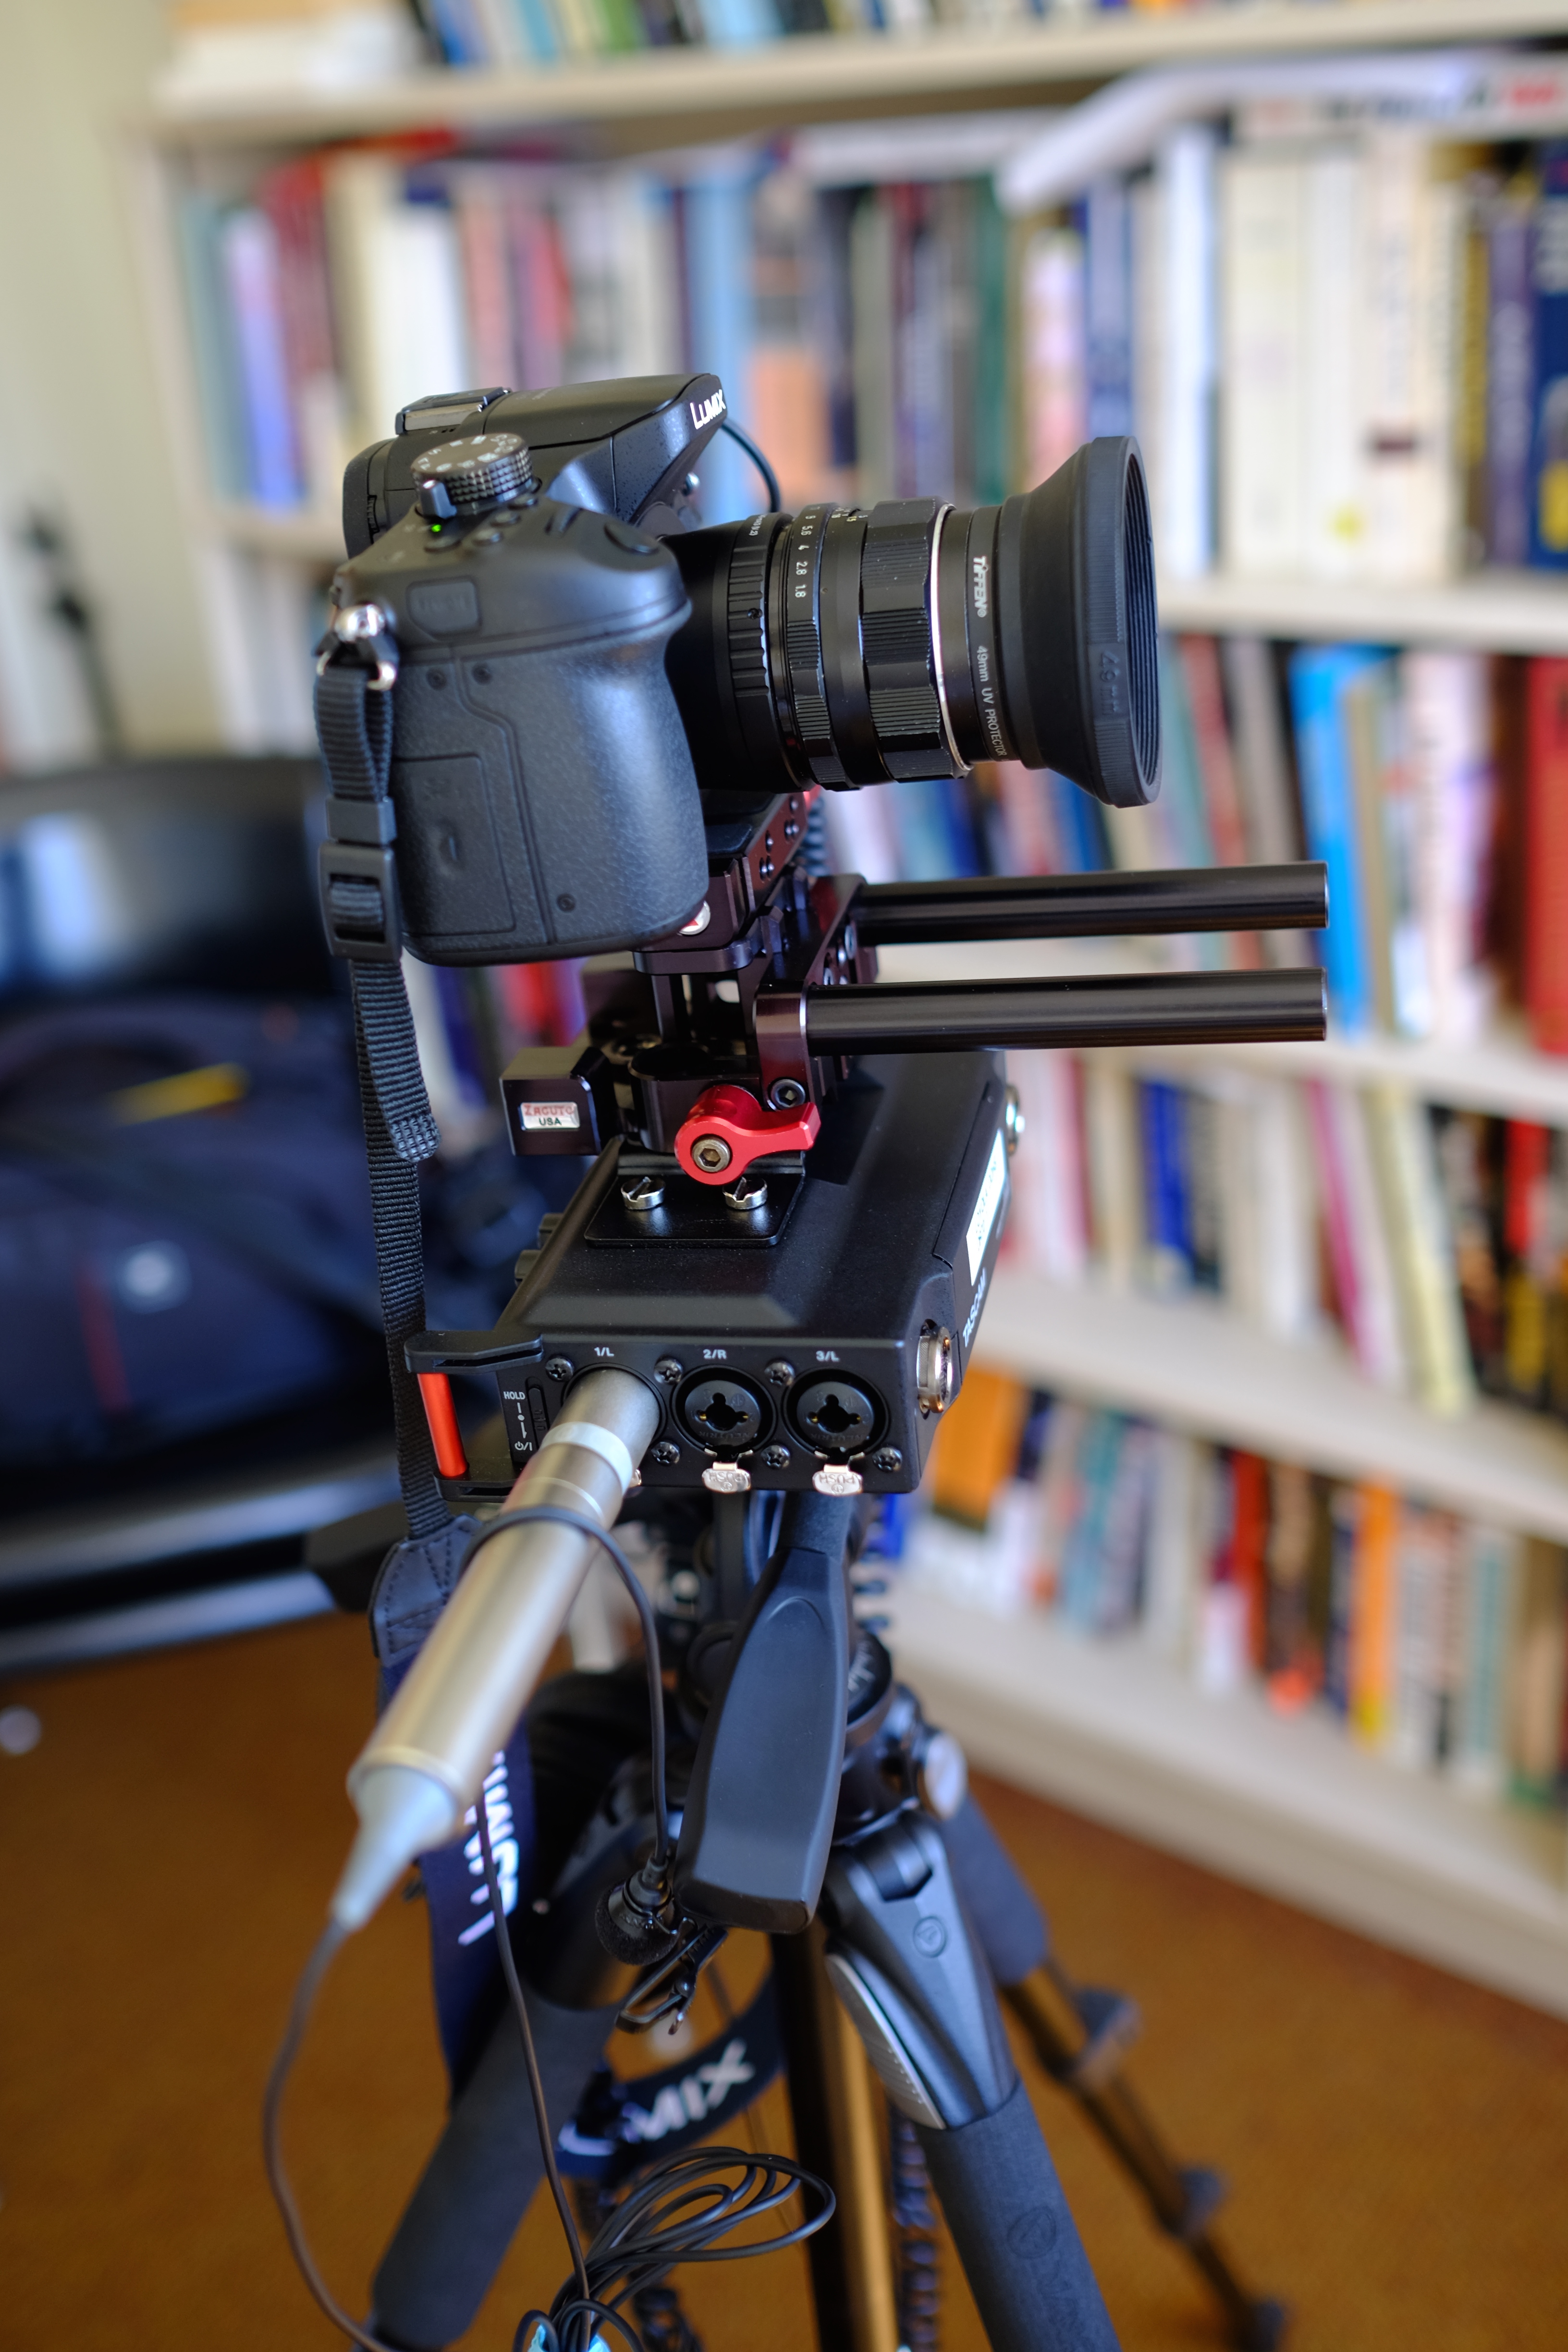
Of course, one of the giant advantages of the DR-70 over the Zoom H6 is rigging it up to your camera. Here I have joined the DR-70 to the GH3 via a Zacuto Mini-DSLR baseplate. Like most Zacuto gear, it is pricey but very high quality. I like this arrangement for a couple of reasons. First, it allows you to quickly disconnect the GH3 from the rig, allowing you to access the battery door, which could be essential in a long shoot – all while not changing any of your framing settings. Secondly, you’ve got a rig and a set of 15mm rods to play with if you need them for a follow focus or perhaps a magic arm. I attach the tripod’s baseplate directly to the DR-70. Everything snaps together in seconds.
Adjust your audio:
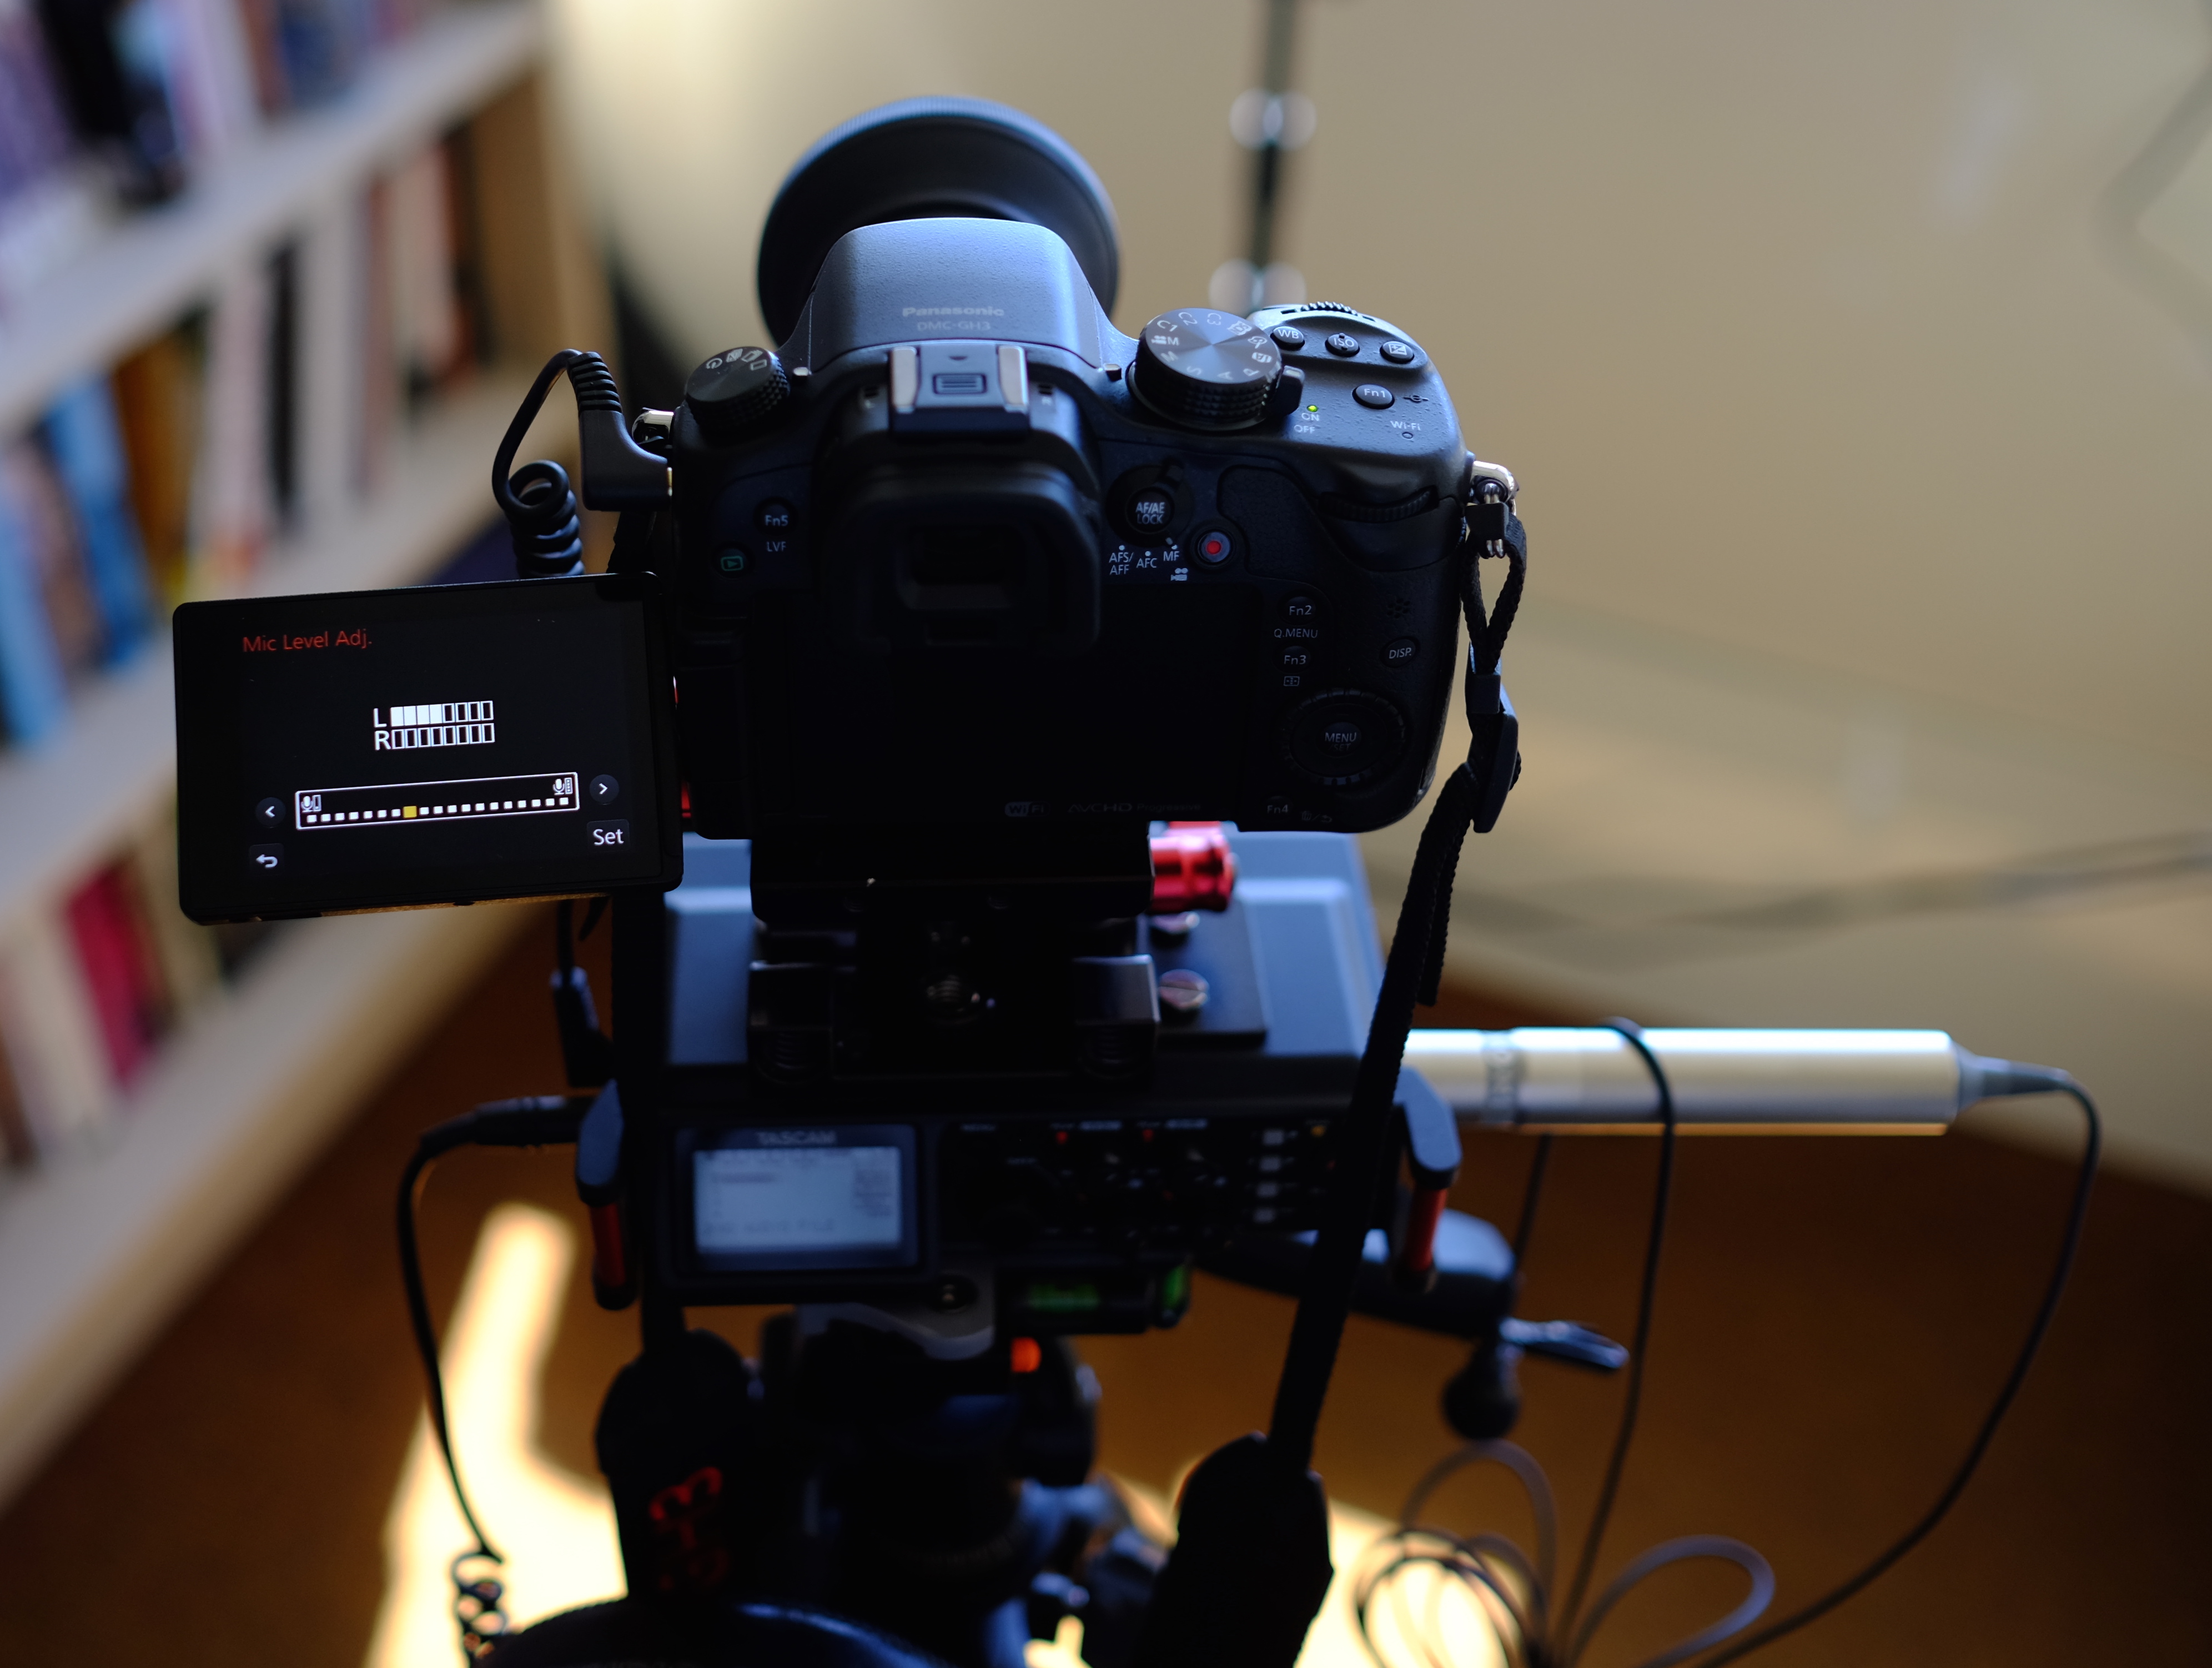
Anytime you record dual-system and port audio to the camera, you need to make sure that your audio setting in the camera isn’t set too high. Make sure the DR-70’s OUTPUT GAIN is set to “CAM.” You can adjust with both the GH3 and the output level in the DR-70’s MONITOR menu.
